CNN~mnistを添えて~
はじめに。
こんにちは。
今回で3回目の投稿なんですけど、全然更新できず、気が付けば年を越して春ですね。。。(´;ω;`)
今回はMNISTを用いて機械学習を学んでみますね。
自分も理解を深めるために書いておきたいと思います。
間違いや、認識が違うところが多分、いや結構あると思うので、全部鵜呑みにするのはだめかも。。。( 一一)
それではMNISTについて触れていこうと思います!
MNISTとは


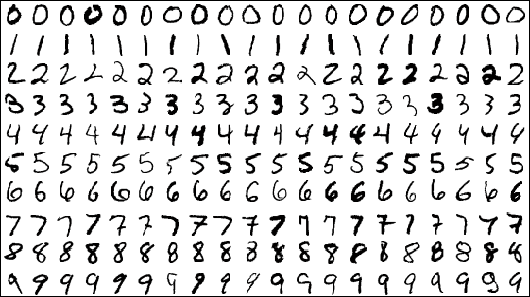
MNISTとは0~9の手書き数字画像のデータベース。
28*28ピクセルのグレースケール画像データ。
MNISTデータ
訓練データ(mnist.train) : 55,000
テストデータ(mnist.test) : 10,000
検証データ(mnist.valid) : 5,000
の計70,000データが詰まっている。
MNISTデータは、手書き数字画像と該当ラベルの2つのパートを持っています。
画像は28*28=784ピクセルの配列をもち、それが55,000もあることから、訓練イメージ mnist,train,imagesは[55000, 784]の配列をもつテンソルとなります。
ラベルは0~9の間数字で、与えられた画像がどの数字であるかを示します。このラベルは、ほとんどの次元が 0 で1つの次元のみ、 1 である形状を持っています。例えば、5 は [0,0,0,0,0,1,0,0,0,0] になります。
よって、訓練ラベル mnist,.train.labels は[55000, 10]の配列を持ちます。
学習の流れ
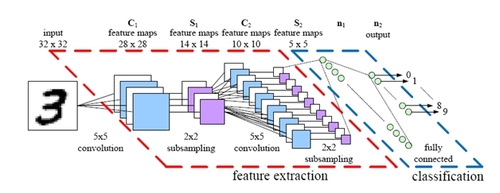
学習には、CNNを利用して学習させていきます。
CNNについては少し複雑なので以下のサイトなんか見てみるといいかもしれないですね('ω')
学習の流れはこんな感じ・・・

※全結合層に対して、過学習を防ぐためにdropaotを施し、そのあとにSoftmax関数を適用しています。
使用したコード
import os
import numpy as np
import tensorflow as tf
from PIL import Image
from tensorflow.examples.tutorials.mnist import input_data
mnist = input_data.read_data_sets("MNIST_data/", one_hot=True)


# 入力
x = tf.placeholder(tf.float32, [None, 784])
# 引数(入力画像、[テンソル数、高さ、幅、チャネル数])
x_img = tf.reshape(x, [-1, 28, 28, 1])

#---畳み込み1層目---

#5×5,32チャンネルのフィルタ定義
f_conv1 = tf.Variable(tf.truncated_normal([5,5,1,32], stddev = 0.1))
#畳み込み&プーリング処理
conv1 = tf.nn.conv2d(x_img, f_conv1, strides = [1,1,1,1], padding='SAME')
b_conv1 = tf.Variable(tf.constant(0.1, shape=[32]))
h_conv1 = tf.nn.relu(conv1 + b_conv1)
h_pool1 = tf.nn.max_pool(h_conv1, ksize=[1,2,2,1], strides = [1,2,2,1], padding='SAME')


#---畳み込み2層目---

#1層目と同様
f_conv2 = tf.Variable(tf.truncated_normal([5,5,32,64], stddev=0.1))
conv2 = tf.nn.conv2d(h_pool1, f_conv2, strides=[1,1,1,1], padding='SAME')
b_conv2 = tf.Variable(tf.constant(0.1, shape=[64]))
h_conv2 = tf.nn.relu(conv2 + b_conv2)
h_pool2 = tf.nn.max_pool(h_conv2, ksize=[1,2,2,1], strides=[1,2,2,1], padding = 'SAME')


#---全結合層---

#7×7×64チャンネル画像を1次元配列に変換
h_pool2_flat = tf.reshape(h_pool2, [-1, 7 * 7 * 64])
w_fc1 = tf.Variable(tf.truncated_normal([7 * 7 * 64, 1024], stddev = 0.1))
b_fc1 = tf.Variable(tf.constant(0.1, shape=[1024]))
h_fc1 = tf.nn.relu(tf.matmul(h_pool2_flat, w_fc1) + b_fc1)

#---ドロップアウト---

#dropout率を定義&適用
keep_prob = tf.placeholder(tf.float32)
h_fc1_drop = tf.nn.dropout(h_fc1, keep_prob)

#---出力層---

w_fc2 = tf.Variable(tf.truncated_normal([1024, 10], stddev=0.1))
b_fc2 = tf.Variable(tf.constant(0.1, shape=[10]))
out = tf.nn.softmax(tf.matmul(h_fc1_drop, w_fc2) + b_fc2)

#---正解ラベル---
y = tf.placeholder(tf.float32, shape=[None, 10])

#---訓練---
#損失関数
loss = tf.reduce_mean(-tf.reduce_sum(y * tf.log(out + 1e-7), axis=[1]))
#誤差の最適化(勾配効果法)
train_step = tf.train.AdamOptimizer(1e-4).minimize(loss)

#---評価---
correct_prediction = tf.equal(tf.argmax(out, 1), tf.argmax(y,1))
accuracy = tf.reduce_mean(tf.cast(correct_prediction, tf.float32))

#---変数初期化---
init = tf.global_variables_initializer()

#---学習---
with tf.Session() as sess:
    sess.run(init)

    test_images = mnist.test.images
    test_labels = mnist.test.labels

    test_images = test_images[:300]
    test_labels = test_labels[:300]
    print(test_images.shape, test_labels.shape)

    saver = tf.train.Saver()

    for i in range(1200):
        train_images, train_labels = mnist.train.next_batch(50)
        feed_dict = {x:train_images, y:train_labels, keep_prob : 0.5}
        _, l, acc = sess.run([train_step, loss, accuracy], feed_dict=feed_dict)

        if (i+1) % 100 == 0:
            print('step: %3d, loss: %.2f, acc: %.2f' % (i + 1, l, acc))

    l, acc = sess.run([loss, accuracy], feed_dict = {x: test_images, y:test_labels, keep_prob: 1.0})
    print('evaluation of test data : loss : %.2f, acc : %.2f' % (l, acc))

    path = saver.save(sess, os.path.join(os.path.dirname('__file__'), 'data', 'regression.ckpt'))

    print("Saved:", path)
今回の学習に関してはミニバッチ法を採用しています。少ないデータ群をランダムに選択し、学習させています。
上記で述べたようにMNISTの学習データは60,000(訓練データ + 検証データ)件テストデータは10,000件あります。
今回は1200回の学習に対して、バッチサイズを50としています。
実行結果は以下のようになりました。

lossとaccuracyの結果から、しっかり学習できているのが分かります('ω')
学習したデータはckptファイルに保存しています。
+α 自分の手書き文字を認識させてみよう♪
最後は手書き文字の認識です。
学習したデータが自分の文字を認識してくれるか確かめてみます!

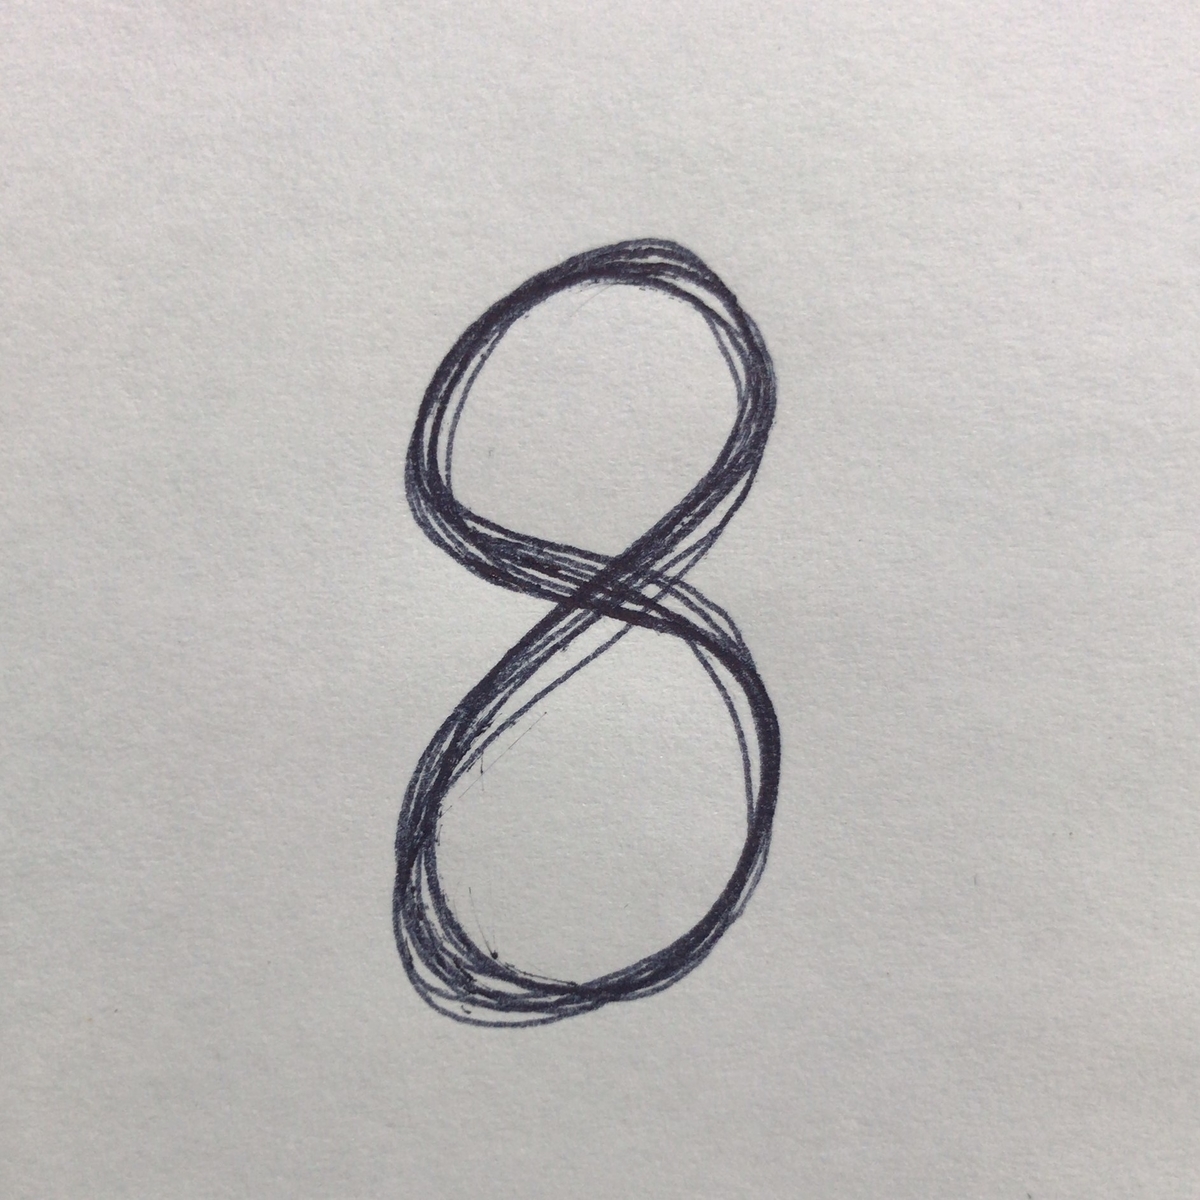
今回「8」を書いてそのデータを[28×28]のデータをmnist.pngとして保存します。 自分の文字が認識されるかドキドキです(>_<)。。。
in_sess = tf.InteractiveSession()
saver = tf.train.Saver()

# check point
ckpt = tf.train.get_checkpoint_state('./data')

if ckpt:
    last_model = ckpt.model_checkpoint_path

    saver.restore(in_sess, last_model)
    # 予測画像load
    predict_img = Image.open('./mnist.png').convert('L')
    predict_img = 1.0 - np.asarray(predict_img, dtype="float32") / 255

    predict_img = np.asarray(predict_img, dtype="float32")
    predict_img = predict_img.reshape((1,784))

    plt.imshow(predict_img.reshape(28, 28))

    prediction = tf.argmax(out,1)
    pred = in_sess.run(prediction, feed_dict={x: predict_img, keep_prob: 1.0})
    #予測結果
    print('prediction:%d' % (pred))
結果は・・・

prediction : 8 としっかり認識されていますね。
補足
anacondaでPILを扱うときにいくつかエラーが発生したので、メモ程度に。。。
この記事と同じ現象が起こったので、、、やっぱりパッケージの依存関係が原因だったみたい。
最後に
今回はMNISTを扱って実際にCNNを実装してみました。まだまだいろんなデータセットがあるみたいなので触れてみたいですね。
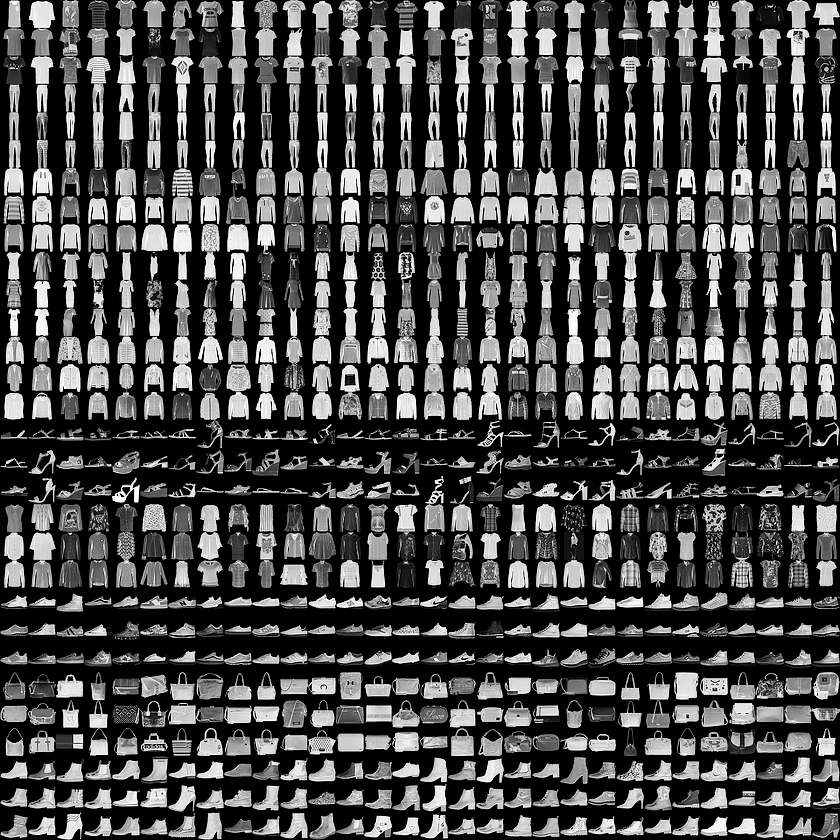
中にはこんなデータセットも(・・)。。。

また触れてみたいと思います♪